Per-User Chatbot Access Control
This feature lets site administrators choose exactly which users can access each chatbot. It is useful for membership sites, gated content, courses, or private support systems where chatbots should only be available to specific users.
Overview
The User Access admin page allows you to add, edit, or remove individual access records. Each record connects a user with a selected chatbot and defines how and for how long that user can access it.
[mwai_chatbot id="default"] on two different posts (post1 and post2) and grant access to user1 for post1 and user2 for post2, both users will still be able to access the chatbot on both posts because the same chatbot ID is used in both locations. If you need separate access control per page or post, create separate chatbots with different IDs, for example: [mwai_chatbot id="default"] and [mwai_chatbot id="chatbot-e8qmxg"] Then place them separately on different posts or pages.
Creating or Editing an Access Record
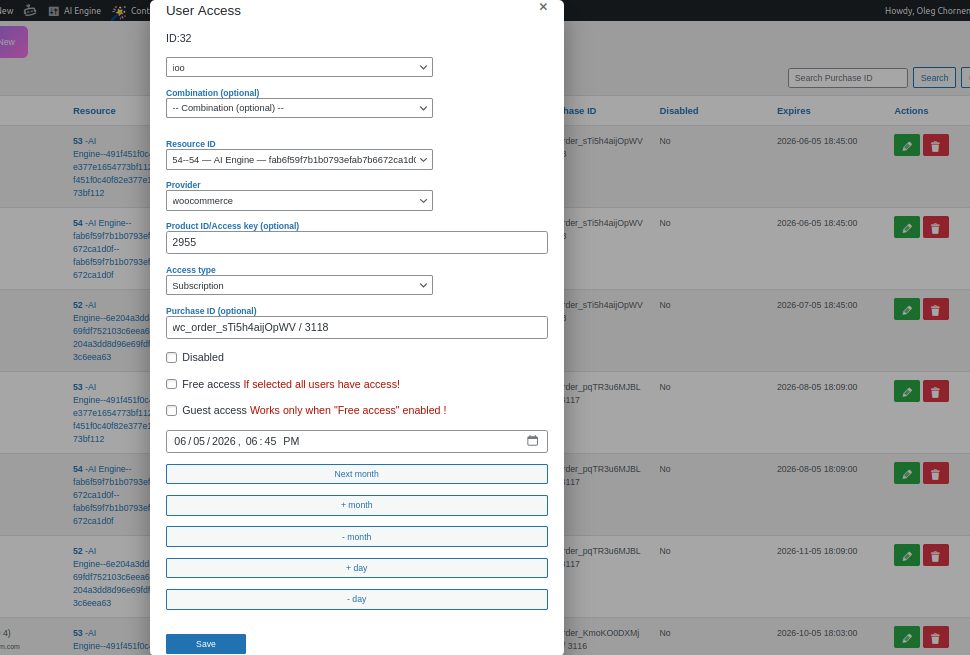
To add a new access entry, open the User Access page and click Add New.
Then fill in the following fields:
- User – Select the WordPress user who will receive access.
- Chatbot – Choose the chatbot to which the user will have access.
- Provider – Choose the provider type:
- woocommerce – access linked to a WooCommerce product or purchase.
- local – manually managed access, not tied to an external order.
- Product ID / Key – An optional identifier used for your own reference. It can contain any string (for example, a product SKU, license key, or note). It does not affect access behavior by default and may be left empty.
- Purchase ID – Another optional reference field used for informational purposes (e.g., an order number or invoice ID). It also does not affect behavior by default.
- Expiration Date – Defines the date when access will end automatically. After this date, the user will no longer be able to use the chatbot.
- Disabled – When checked, the access record is immediately inactive. This provides a quick way to suspend or restore access without deleting the record.
- Free access – When checked, all registered users have access.
- Guest access – When checked, guest have access. This works only when Free access checked.
How It Works
When a user logs in, the plugin checks for active access records. Only chatbots with valid, non-expired, and non-disabled access entries appear for that user.
Example Use Cases
- Grant specific chatbots to premium members while others remain free.
- Manually give temporary access to beta testers or support clients.
- Combine with WooCommerce purchases for automatic access management.
Manual vs. Automatic Access
| Feature | Per-User (Manual) | WooCommerce (Automatic) |
|---|---|---|
| Access created by | Admin manually on the User Access page | Plugin automatically after purchase |
| Requires WooCommerce | No | Yes |
| Expiration control | Set manually per user | Calculated from product duration (e.g., 1 month per unit) |
| Best for | Private access, testing, custom memberships | Paid subscriptions, automatic license creation |
| Data fields | Product ID, Purchase ID, Expiration, Disabled | Linked order ID, product, and expiration auto-generated |
Feedback
We continue refining access management to support more integrations and automation. Feedback and suggestions are welcome.